Today, I’m going to show you a tutorial on how to make your designs on Redbubble water bottles look totally seamless and high quality. We’ll do this using a template I’ve made for you, which is free to download. Let’s do it!
Why Do I Need a Template?
I think we can all agree that artwork looks better when it doesn’t have a big nasty seam running up the middle of it. Unfortunately, the Redbubble uploader guidelines can cause this seam on several products, including water bottles.
Part of the reason this happens is due to the Redbubble upload screen.
On some Redbubble products, when you upload an image, you can see a overlay on the image, often either a grey area or dotted lines. For example, see this Acrylic Block upload screen.
The grey area indicates what will be cut off in the final product. Definitely a useful guideline to have.
Let’s look at the upload screen for water bottles.
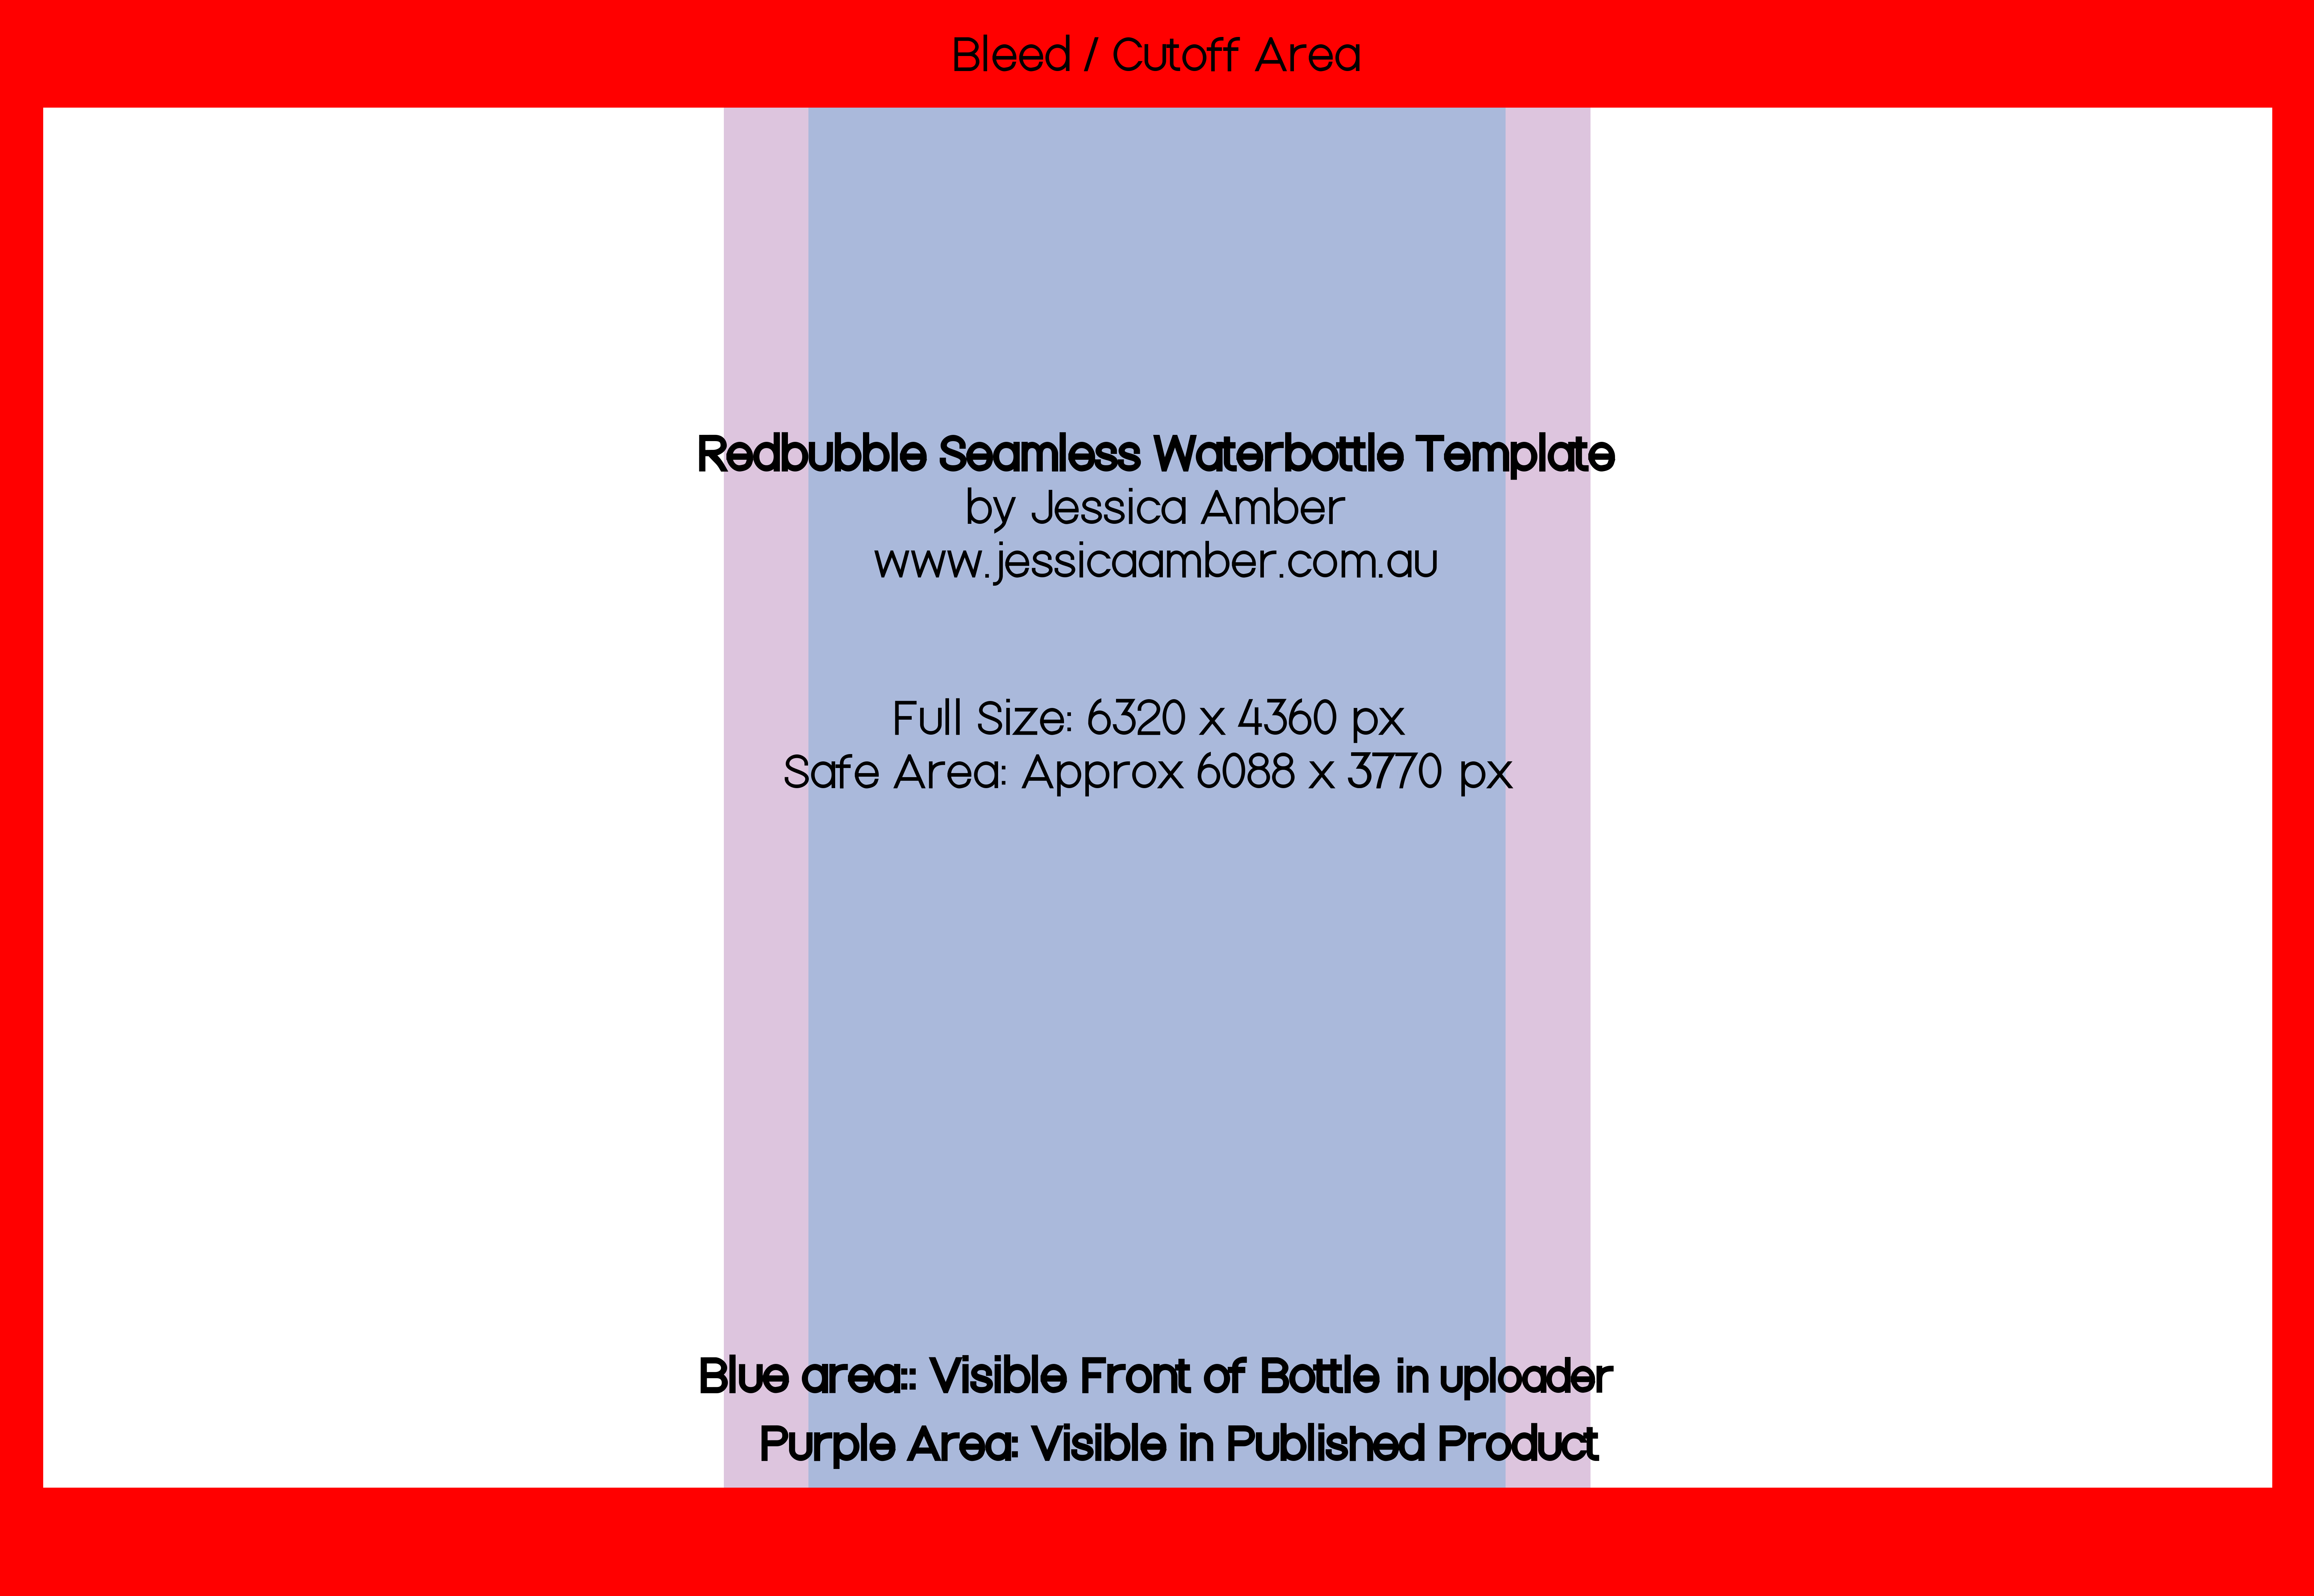
No markings for cut off or bleed areas. So you’d reasonably assume that the entire rectangle gets put on the bottle. But it doesn’t! The edges do get cut off. And unless you use a template, you won’t know where that cut off area is.
Pick Your Artwork
I’m going to fix up a design I’ve done called ‘Memphis Cats‘. This design looks pretty good on several products, but on Redbubble’s water bottles, but as you saw before, it’s got an ugly seam running up the back.
So, let’s fix this artwork to make it beautifully seamless.
Download the Template
After a lot of editing and double-checking between Redbubble’s uploader page, product page, and Photoshop, I created this seamless template for water bottles.
This file is 2x larger than Redbubble’s recommended image size for water bottles. (Redbubble recommended: 3160 x 2180px. My template: 6320 x 4360px)
I did this for two reasons. 1. Hopefully further reduce seam issues 2. Able to put larger artworks on the template
As long as the file you use is in the same image ratio, it’ll scale to fit the item just fine.
This tutorial was written using an older version of my template. It will still work, but screenshots will use the old template instead of the new one.
Download it as PNG by saving the image, or as PSD by clicking the file below.
The PNG version has a transparent background, while the PSD version has a yellow background. We’ll be using the PSD version for this tutorial because the yellow BG will make the process of making the art seamless much easier.
When I was transferring this blog post to a new platform in October 2021, I was using Version 4 of my template, and that template has some transparent blue and purple areas. And I made an interesting discovery. The purple areas of 50% or less transparency would simply not appear on the published product!
Here’s how the file looked in Photoshop. The circles on the left are 100% opaque, the top left are 25% transparent, and the bottom are 50% transparent.
And here’s how the file looked when published to Redbubble.
The light purple areas are gone! I guess the lesson here is, be vary careful when putting transparent art on waterbottles, and always double check your published products!
Back to the tutorial. See how no red is showing on the published waterbottle? All that red area is being cut off.
Now, let’s get into Photoshop.
Editing Your Art
Open up a copy of my template, as well as your artwork, in your preferred photo editing software that supports using layers. (I’m gonna use Photoshop CC 2019). Use an artwork that you’ve made into a seamless square. If you haven’t done this, go do it now! You can use this Spoonflower tutorial.
My artwork is already a seamless square tile, 8500 x 8500px, but you don’t have to exactly match those dimensions.
Since the shape of the template is more like a rectangle, I’m going to make my artwork a rectangle too. A. Making the canvas wider. Go to menu bar Image > Canvas Size, and set width to 200%, and the anchor to centre left B. Select your artwork and go to menu bar Layer > New > Layer Via Copy C. Move the duplicate to the right half of the canvas. Then select all and go to menu bar Image > Flatten.
Now that we have a seamless rectangle, let’s copy it and put it in our template, in the layer above the yellow rectangle. Said layer is part of a clipping mask, so anything you put on this layer will not be visible beyond the borders of the yellow rectangle.
As you can see, my artwork is much bigger than the canvas, so I’m going to menu Edit > Free Transform, and scale it down so the left and right edges are perfectly aligned with the left and right sides of the yellow rectangle.
Two other things you can do to make this step easier: 1. Turn on Snapping to layer edges. Do that by going to menu View > Snap To > Layers. 2. Lock the aspect ratio, so you art won’t look stretched. There’s a little chain symbol that’ll appear under the menu bar when you’re transforming your artwork. Make sure that is selected.
WarningWhen Transforming, you can choose the Interpolation,
which is the method used to generate new pixels when scaling art bigger
or smaller.
You can see this at the end of the Transform bar. Selecting
the right interpolation method is very important!
If you're making art smaller, use Bicubic or Bicubic Sharper. If making art bigger, use Bicubic Smoother. If scaling pixel art, use Nearest Neighbour to preserve hard edges.
Now we’ll make the artwork cover those exposed parts of the yellow rectangle.
A. Duplicate the artwork 2 times, and move one copy to line up on the top edge, and the other to line up on the bottom edge. (Oh, and you can disable that guidelines folder). B. Next, select all 3 artwork layers, and go to menu bar Layer > Merge Layers
Lorem ipsum dolor sit amet, consectetur adipiscing elit. Ut elit tellus, luctus nec ullamcorper mattis, pulvinar dapibus leo.
Now we’ll make sure there’s no seam on the artwork. A. Unlink your artwork from the yellow rectangle by Alt + Click on the gap between the the yellow rectangle layer, and your merged artwork, in the Layers menu. Your cursor will turn into a downwards arrow with a line going through it. B. Use the Single Column Marquee tool in the toolbar (right-click on the Rectangular Marquee Tool if you can’t see it), and select the single column of pixels on the left side of your artwork.
Go to menu Layer > New > Layer Via Copy. That one thin strip of pixels will be copied on a new layer. Now go to menu Edit> Free Transform. Stretch out that strip of pixels to the left, until it touches the left edge of the canvas. Use Nearest Neighbour interpolation. If the stretched layer looks transparent, just duplicate the layer until it looks opaque.
Do the same thing to the right side of the canvas.
Now Save the image as a PNG or JPG, and upload it to Redbubble. And you’re good to go!
The Finished Design
Here is how my water bottle looked once it was published on Redbubble.
Front
Back
Yes! The design is completely seamless on the back of the bottle!
Conclusion
I’m very happy with how this artwork turned out. The design on the water bottle looks perfectly seamless, which I believe makes the whole product look more professional, higher quality, and hopefully, more appealing to potential buyers. (If you’re one of those people, please check out Memphis Cats design on Redbubble.
For more Redbubble templates, check out my template masterpost. If you use this tutorial and want to give feedback, leave a comment below. I’m always eager to help this community make the best quality products possible, as it makes the platform look more legit and attracts more customers, which is good for all of us!


